Table of Contents
Hey lovely ladies! I wrote a whole guide on styling this year’s more refined take on ripped knee jeans, but a bunch of you asked the follow-up question I didn’t actually answer there: how to distress jeans yourself, from scratch, at home. So here it is, the full hands-on tutorial.
The first time I tried this, I went in with zero plan and a pair of scissors, and the result looked less “effortlessly worn-in” and more “accident.” Turns out, good distressing is actually a slow, controlled process, not a five-minute hack. Once I slowed down and used the right tools for each step, the difference was huge.
By the end of this guide, you’ll know exactly which tools to use, the order to use them in, and how to avoid turning one neat rip into a pair of jeans you can’t actually wear in public. Let’s get into it.
What You’ll Need Before You Start
Gather your supplies before you touch a single pair of jeans. Having everything ready keeps you from rushing a step because you’re waiting on something.
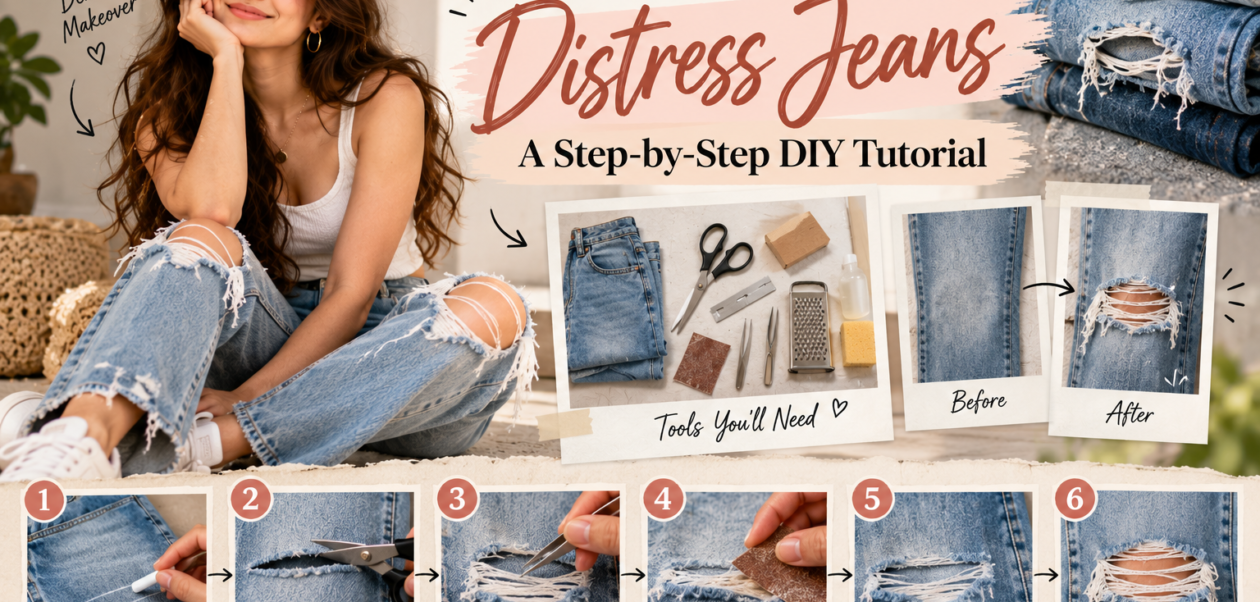
You’ll want a pair of jeans you’re willing to experiment on, sharp fabric scissors or a razor blade, a pair of tweezers, fine-grit sandpaper around 220-grit, and a cheese grater you don’t mind retiring from kitchen duty afterward. If you’re planning to fade or lighten any areas, add diluted bleach and an old sponge or paintbrush to the list. A thick piece of cardboard or a block of wood to slide inside the pant leg is essential too, it protects the back layer of denim while you work on the front.
Work somewhere with good ventilation if bleach is part of your plan, and lay down an old towel or plastic sheet to protect your work surface. It’s also worth testing every technique on a scrap of fabric or an inseam hem first, so you get a feel for how much pressure each tool actually needs before working on a visible area.
Step 1: Choose the Right Jeans
Not every pair of jeans distresses equally well, and this decision matters more than people expect. Denim with a low elastane or spandex content fades and frays far more naturally than heavily stretchy denim, which tends to resist fraying and can look stringy or synthetic once cut.
If you’re shopping for a new pair specifically for this project, it’s worth understanding the difference between true denim and a lighter cotton-twill blend first, since the two distress very differently. My denim vs cotton breakdown covers exactly what to look for.
A medium to dark wash generally gives you more visible contrast once you start fraying or sanding, since the lighter, undyed core of the denim shows up clearly against the darker surface color. If you’d rather start with a pair in a warmer neutral instead of classic blue, the khaki color trend has also shown up in denim this year and takes distressing just as well.
Step 2: Mark Where You Want the Distressing
Try the jeans on and use tailor’s chalk or a light pencil to mark exactly where you want rips, fraying, or fading. Working directly on your body, rather than guessing at a flat pair of jeans, makes a genuinely big difference in how natural the final placement looks.
Classic placement areas include the knees, upper thighs, and along the hem, since these are the spots where denim naturally creases and wears through from real use. If you want your distressing to echo the natural whiskering pattern that develops from actual wear, it’s worth understanding how that fading forms in the first place. I covered that in detail in my piece on what whiskers on jeans actually are, and the same logic applies here, work with your body’s natural crease points rather than placing marks randomly.
It’s also worth thinking about proportion and how a rip will actually read once you’re standing and moving, not just sitting still while you mark it. My inseam vs outseam guide is a useful refresher if you’re unsure how placement near the hem will actually look once the jeans are on and worn normally.
Step 3: Create Rips and Tears
This is where you’ll make your first real cuts, so slow down here more than anywhere else in the process.
- Slide your cardboard or wood block inside the pant leg at the marked spot, so you only cut through the front layer of fabric.
- Using sharp scissors or a razor blade, cut a small horizontal slit within your marked area, starting smaller than you think you want.
- Pull gently on the fabric around the slit to see how it opens and stretches before deciding whether to make it larger.
- Vary the size and shape of any additional rips rather than making them uniform, since slightly irregular shapes read as more natural.
Remember that you can always make a hole bigger later, but you can’t make it smaller, so always start conservative and build up gradually.
Step 4: Fray the Edges
A clean cut edge looks obviously man-made, so this step is what actually sells the distressed effect.
Using tweezers, gently pull out the horizontal threads along the edges of your cut, leaving the vertical threads intact. This creates that classic frayed, stringy look you see on well-worn denim. Work slowly and pull a few threads at a time rather than yanking large sections at once, which can tear the surrounding fabric unevenly.
A cheese grater is a faster alternative for fraying, especially along larger areas like a hem or a wider rip. Hold the jeans taut over your cardboard block and rub the grater firmly back and forth in one direction, never in a circular motion, which can shred the fabric unpredictably. Start with lighter pressure and build up, checking your progress often.
Step 5: Soften and Thin With Sandpaper
Sandpaper is your most controllable tool, and it’s genuinely the best choice for subtle, realistic-looking wear rather than full holes.
Rub fine-grit sandpaper in one consistent direction over the areas you want to look naturally worn, like the thighs or the top of the knee, rather than scrubbing in circles. This thins the top layer of denim and lightens the color gradually, mimicking the kind of gentle wear that takes months to develop naturally.
Check your progress frequently, since sandpaper works faster than it looks like it should, and it’s easy to go further than you intended.
If you want a hole rather than just thinning, continue sanding the same spot until you work all the way through the fabric, then switch to tweezers to fray the newly exposed edges.
Step 6: Fade with Bleach (Optional)
If you want a lighter, more worn-in color alongside your rips, bleach is the classic tool for the job, though it’s worth treating carefully.
Mix a diluted bleach solution, roughly equal parts water and bleach, and apply it with a sponge or an old paintbrush rather than soaking the entire garment, unless you want the whole piece lightened evenly. Let it sit for a few minutes, checking frequently, since bleach works faster than you’d expect and can’t be undone once it’s lightened the fabric.
Rinse thoroughly once you’ve reached the color you want, and wash the jeans separately afterward to remove any remaining bleach residue before it has a chance to affect anything else in a future wash load.
Step 7: Wash and Dry to Set the Look
Your final step is washing the jeans to soften all that fraying and let the distressed areas settle into their finished look.
Turn the jeans inside out and wash them on a gentle, cold cycle, then air dry rather than using the dryer. Heat genuinely accelerates further fraying, which can turn a carefully controlled rip into something much bigger than you planned. This is actually the same principle behind how much jeans typically shrink in general, heat is the main driver of unwanted changes to denim, distressed or not.
Safety Tips and Common Mistakes
A few habits separate a smooth distressing project from a frustrating one.
| Tool | Best For | Caution |
| Scissors or razor | Initial rips and holes | Always cut over cardboard, never freehand near your leg |
| Tweezers | Fraying cut edges | Work slowly, pull a few threads at a time |
| Cheese grater | Fast, textured fraying | Only move in one direction to avoid shredding |
| Sandpaper | Subtle thinning and fading | Check progress often, it works faster than expected |
| Bleach | Color fading | Always dilute, ventilate your space, rinse thoroughly |
My honest advice: practice every technique on an old pair or a fabric scrap before touching a pair you actually care about. The learning curve is real, and your first attempt almost always teaches you something the second attempt benefits from, the same way getting comfortable with any new skill in your bottom wear rotation takes a bit of trial and error.
How to Keep Your DIY Distressing From Going Too Far
The current trend favors restraint, a single well-placed rip rather than an all-over shredded look, so it’s worth pacing yourself even if you’re having fun with the process.
Step away and look at your progress in a mirror every few minutes rather than working continuously in one spot. It’s much easier to notice when you’ve done enough if you’re checking regularly rather than only looking once you’ve already gone further than planned.
If you’re aiming for the kind of subtle, intentional distressing that reads as current rather than dated, my guide to styling ripped knee jeans covers exactly what that balance looks like once your DIY project is finished and you’re ready to actually wear it.
A single rip or fade is often genuinely enough, especially if you’re planning to build the piece into your capsule wardrobe rather than treating it as a one-off experiment.
FAQs
1. What’s the easiest way to distress jeans at home?
Sandpaper is the most beginner-friendly tool, since it works gradually and gives you the most control. Save sharper tools like razors and cheese graters for once you’re more comfortable with the process.
2. Do I need special equipment to distress jeans?
No, most of what you need, scissors, sandpaper, a cheese grater, and tweezers, are household items. Bleach is optional if you also want to fade the color.
3. Will distressing ruin my jeans if I make a mistake?
It’s possible to overdo a rip, but starting conservative and building up gradually minimizes that risk. You can always distress further later, but you can’t undo a cut that’s too large.
4. What kind of jeans distress best?
Denim with low stretch or elastane content fades and frays more naturally. Heavily stretchy denim tends to resist fraying and can look stringy or synthetic once cut.
5. How long does the whole process take?
It varies by how much distressing you’re doing, but plan for at least thirty minutes to an hour for a single, well-executed rip with proper fraying, longer if you’re adding bleach fading too.
6. Should I wash my jeans before or after distressing?
After. Washing and air drying once you’ve finished distressing helps soften the frayed edges and sets the final look, rather than fraying further unpredictably in a hot dryer.
7. Can I fix the distress that went too far?
A few discreet hand stitches just inside the edge of an overly large hole can stabilize it, though there’s no way to fully reverse a rip once it’s been made. This is exactly why starting small matters.
The Bottom Line
So there you have it, ladies, now you know exactly how to distress jeans at home, from the first careful cut to the final wash that sets the whole look. The real secret is patience, checking your progress constantly, and starting far more conservative than you think you need to.
My honest advice is to practice on a pair you don’t love before working on your favorite jeans. The first attempt is always a learning experience, and a cheap practice pair means your mistakes stay low-stakes.
Have you tried distressing your own jeans before, or is this your first attempt? Let me know in the comments, I’d love to hear how it goes.
Happy styling, ladies!