Table of Contents
Hey lovely ladies! Can we talk about the yearly panic of realizing you have a holiday party in two days and absolutely nothing festive to wear? I’ve been there more times than I’d like to admit, standing in front of my closet convinced I needed to buy something new.
Then one year, broke and short on time, I actually tried a Christmas outfits DIY approach instead, and it completely changed how I think about holiday dressing.
Turns out, some hot glue, a few craft supplies, and stuff already hanging in your closet can get you to a genuinely festive way faster and cheaper than another trip to the mall. I’ve made everything from a no-sew sweater in twenty minutes to a full Mrs. Claus-inspired dress using pieces I already owned.
By the end of this guide, you’ll have a full lineup of DIY Christmas outfit ideas you can actually pull off at home, no sewing machine required for most of them, plus my honest take on when DIY makes sense and when it’s smarter to just buy the piece.
Why DIY Your Christmas Outfit This Year
I get it, DIY sounds like a lot of effort when you could just order something online. But hear me out on why it’s actually worth trying at least once.
It’s genuinely cheaper. Most of these looks cost under fifteen dollars in supplies, especially if you’re starting with a plain top or dress you already own. Compare that to a specialty holiday outfit you’ll maybe wear once, and the math works out heavily in DIY’s favor.
It’s also one-of-one. Nobody else at your office party is going to show up in the exact same hand-decorated sweater you made, which is honestly more than I can say for half the store-bought “ugly sweaters” I see every December.
And it’s genuinely fun. There’s something satisfying about building an outfit with your own hands instead of just clicking add to cart, especially if you’re doing it with a friend or your kids over a weekend.
The Easiest No-Sew Christmas Sweater Hacks
Let’s start with the most classic DIY Christmas outfit project, the festive sweater, because you genuinely don’t need to know how to sew for any of these.
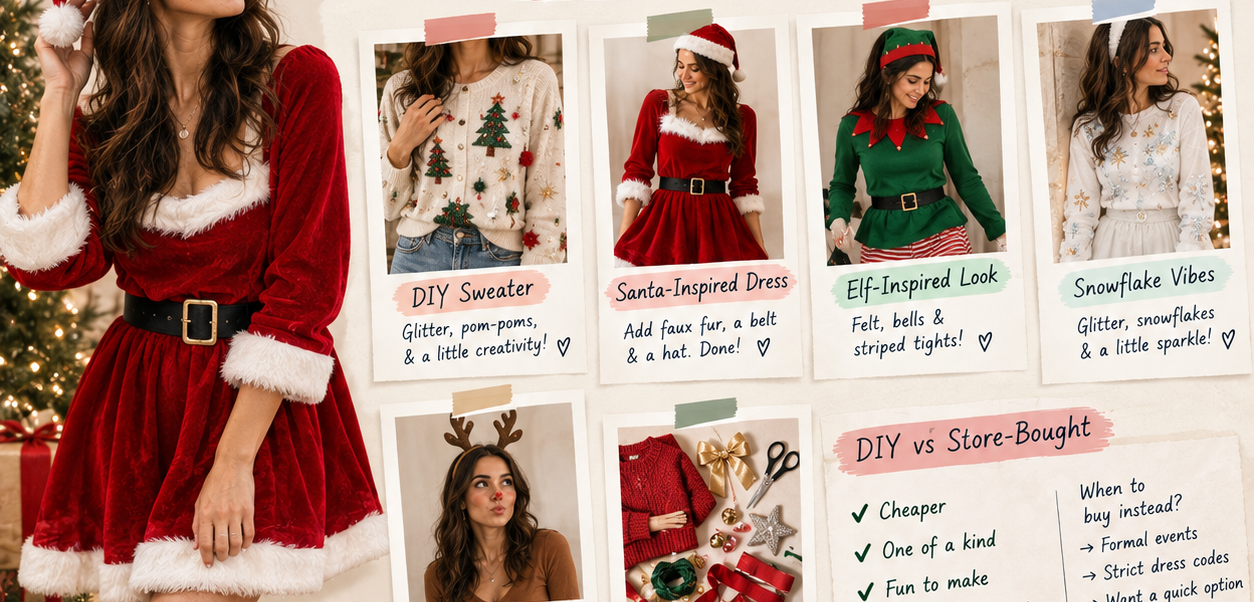
Iron-on glitter transfers are my go-to for a clean, polished result. Cut simple shapes, trees, stars, snowflakes, from glittery iron-on sheets, then iron them onto a plain sweatshirt following the package instructions. Add a few pom-poms with fabric glue for texture, and you’ve got a sweater that looks intentional, not thrown together.
Hot glue is honestly the MVP tool of Christmas sweater DIY. Unwrapped candy canes glued in rows, small ornaments arranged into a tree shape, or holiday pins clustered together all work beautifully with nothing but a glue gun and a plain sweater as your base.
If you want something a little more elevated, cotton batting hot-glued across a white sweater as fake snow, topped with small felt house shapes and tiny bottle-brush trees, makes a genuinely charming holiday village sweater that reads far more expensive than it was to make.
Choosing the right base sweater matters more than people expect. A slightly heavier knit holds glued embellishments better than a thin, lightweight top, which is the same fabric weight logic that applies to plenty of other garments, just applied here to how well your decorations actually stay put through a whole party.
DIY Santa-Inspired Red Dress Look
This is one of my personal favorites because it looks genuinely put-together while being incredibly simple to execute. Start with a red dress you already own, ideally something with a bit of structure.
Add white faux fur trim along the neckline, sleeves, and hem using fabric glue, no sewing needed if you’re using a strong fabric adhesive and pressing firmly while it sets. A simple black belt cinches the waist and instantly gives the whole look that classic silhouette.
Top it off with a Santa hat or a simple red headband, and you’ve got an outfit that reads intentional and festive without looking like a full costume. This version also works beautifully layered under a coat for outdoor holiday events, since the dress base keeps you polished even once you add a warm layer on top.
DIY Elf-Inspired Outfit
The elf look is one of the most versatile DIY Christmas outfit ideas, since it scales from subtle to full-costume depending on how far you want to take it.
For a subtle, wearable version, start with a green top and pair it with striped tights or leggings. Add a simple pointed collar cut from felt and glued or pinned to the neckline, and finish with a small bell or two attached to your shoes or a headband.
For a bigger group or party moment, sew or glue green felt trim along the edges of a red dress, adding a pointed hat to complete the effect. This version is genuinely a crowd favorite for office parties and family gatherings where everyone’s dressing up together.
DIY Snowflake and Winter Wonderland Look
If red and green aren’t your color palette, this route leans into whites, silvers, and icy blues instead, and it photographs beautifully.
Layer a white dress or top with silver glitter accents applied using fabric glue in a light, scattered pattern to mimic falling snow. Paper or fabric snowflakes taped or pinned to the sleeves add dimension without much effort at all.
White eyeliner and a silver highlighter on your cheekbones finish the effect once you’re actually getting dressed for the party, giving you that frosty, winter-wonderland glow without needing full costume makeup.
DIY Reindeer-Inspired Outfit
This one’s a personal favorite for its simplicity. A brown top and leggings form your base, and a small red nose, made from a sticker or a dab of red lipstick, does most of the visual heavy lifting.
DIY antlers cut from brown cardboard or shaped from pipe cleaners and attached to a plain headband complete the look in minutes. A little brown eyeshadow swept across your cheeks and a touch of sparkle on your nose finishes the effect.
This is genuinely one of the fastest looks on this list if you’re short on time, and it works well over a plain long-sleeve layering piece you already have in your closet for extra warmth.
DIY vs Store-Bought: Which Route Makes Sense for You
Not every situation calls for DIY, so let’s be honest about when it’s actually worth the effort.
| DIY Christmas Outfit | Store-Bought Outfit | |
| Cost | Usually under $15 in supplies | $30 to $80+ depending on style |
| Time needed | 20 minutes to a few hours | Instant, once it arrives |
| Uniqueness | One of a kind | Risk of matching someone else |
| Best for | Office parties, family gatherings, casual events | Formal parties, professional events |
| Reusability | Decorations often single-use | Often wearable again |
My honest take: DIY is the clear winner for casual and mid-size gatherings where a little personality goes a long way. For anything formal, like a work holiday dinner with a strict dress code, I’d lean store-bought or build your DIY touches into accessories only, rather than the full outfit.
Accessorizing Your Christmas Outfits DIY
Sometimes the smartest DIY move isn’t the outfit itself, it’s the accessories layered on top of something you already own.
A gift-bag purse made from a small wrapped box or a decorative gift bag with a ribbon handle is a fun, low-effort statement piece that instantly reads festive. A candy cane wand, made by wrapping red tape around a white stick, adds a playful prop to photos without any real effort.
Layering textures also does a lot of visual work here. Mixing velvet, faux fur, and a bit of metallic ribbon or sequin trim over your base top or dress creates that rich, cozy holiday feeling even if the individual pieces are simple on their own.
How to Care for Glitter, Glue, and Embellished Pieces After the Party
A few care habits keep your DIY pieces looking good beyond a single wear, especially if you want to reuse the base garment for something else later.
Spot clean rather than machine washing whenever possible, since hot glue and fabric adhesive can soften or come loose in a regular wash cycle. If you do need to wash the piece, turn it inside out and use cold water on the gentlest cycle available.
Store embellished pieces flat rather than hanging them, especially anything with glued-on decorations, since hanging puts stress on the adhesive points and can cause pieces to peel off over time.
If your base sweater or top starts pilling from the glue application process or general handling, it’s worth knowing how to remove those lint balls so the piece still looks presentable if you decide to wear it again next season.
Common DIY Mistakes to Avoid
A few habits trip people up when they’re first trying this out, so let’s fix them before you start gluing things.
Using the wrong glue for the fabric is probably the biggest one. Regular craft glue often doesn’t hold on stretchy or heavily textured fabric, so look specifically for a fabric fusion or fabric-rated adhesive for anything you actually plan to wear and move around in.
Overloading one small area is another common issue. Spreading embellishments across the whole garment, rather than clustering everything in one spot, creates a much more balanced, intentional-looking finished piece.
Skipping the dry time is a mistake I’ve made myself. Most fabric glues need several hours, sometimes overnight, to fully set. Wearing the piece too soon risks decorations shifting or falling off mid-party.
Starting from the wrong base piece can undercut the whole project too. A great DIY design still needs a solid foundation, so think through your existing bottom wear and tops before committing supplies to a piece that doesn’t actually fit or flatter you well to begin with.
FAQs
1. Do I need a sewing machine for these DIY Christmas outfit ideas?
No, most of the ideas in this guide use fabric glue or a hot glue gun instead of sewing, which makes them accessible even if you’ve never touched a sewing machine.
2. How much does a DIY Christmas outfit typically cost?
Most projects run under fifteen dollars in supplies, especially if you’re starting with a plain top, sweater, or dress you already own.
3. What’s the easiest DIY Christmas outfit for a last-minute party?
The reindeer-inspired look is genuinely the fastest, since it only needs a brown top, simple pipe cleaner antlers, and a bit of makeup to pull together in minutes.
4. Will glued decorations survive a full party?
Yes, if you use a proper fabric adhesive and let it dry fully beforehand, usually several hours or overnight. Skipping the drying time is the most common reason decorations come loose.
5. Can I reuse the base sweater or dress after removing the decorations?
Often, yes, especially with glued embellishments, which can usually be gently peeled or picked off. Just expect some light residue that may need a bit of extra care to remove completely.
6. Is DIY appropriate for a formal holiday party?
I’d lean more conservative for formal settings. Save the full costume-style DIY looks for casual or family gatherings, and stick to subtle DIY accessories, like a festive brooch or ribbon detail, for anything with a stricter dress code.
7. What supplies should I always have on hand for holiday DIY outfits?
Fabric glue or a hot glue gun, felt in a few colors, a headband, and some basic ribbon or trim cover the vast majority of the looks in this guide.
The Bottom Line
So there you have it, ladies, a full lineup of Christmas outfits DIY ideas that genuinely don’t require a sewing machine, a big budget, or a ton of free time. Whether you’re going full Mrs. Claus or just adding a few festive touches to something already in your closet, a little creativity goes a long way this time of year.
My honest advice is to start small. Pick one look from this list, gather your supplies this weekend, and give yourself a proper trial run before the actual party. You’ll thank yourself for not scrambling at the last minute.
And if DIY becomes a regular part of how you approach the holidays, it’s worth thinking about how these pieces fit into your broader capsule wardrobe too, rather than one-off costumes that only get worn once and then forgotten in a drawer.
Which DIY Christmas outfit are you most excited to try this year? Tell me in the comments, and don’t forget to check out my guide on what to wear for a Christmas party if you want more inspiration beyond the DIY route too.
Happy styling, ladies!